Bend it like Fullmer: All about Shape Bender
Learn how to bend and warp shapes using the simple but powerful Shape Bender extension, available for download on the Extension Warehouse.
Drawing a straight line in SketchUp is a cinch. But what if you need to bend that line, or perhaps a more complex shape, into a specific curve? Enter Shape Bender, a SketchUp extension that can quickly transform straight geometries into complex curves. Let’s walk through downloading and using Shape Bender in your design workflow.
Chris Fullmer, the creator of Shape Bender, originally built it to solve a problem he encountered while designing a landscape. He modeled a curved rock wall for the front entryway of an office building, and he wanted to model the client's name in signage following the bend of the rock formation but couldn’t find a simple way to do it. Chris created his own extension to solve the problem – talk about being proactive. With its unparalleled ability to transform straight geometries into exquisite curves, this extension became an invaluable tool for a wide range of architectural designers.
What Shape Bender does is pretty straightforward: It takes any 3D object in your model and stretches it along a pre-drawn path you select. Take a look at the following examples.

 The bending path (above left) is a 3D spiral.
Getting started with Shape Bender
Ready to bend reality with your designs? Head over to SketchUp’s Extension Warehouse and download the Shape Bender extension.
A step-by-step guide
To master this tool, you’ll need to remember two essential elements: the "base line" and the "bend line." The “base line” is your straight line, defining your shape's original size and position. The “bend line” is the curve you want your shape to adopt. Here’s a walk-through of getting started with Shape Bender:
-
Ensure the object you want to bend is either a group or a component.
-
Rotate it (if necessary), so it's lined up lengthwise along the red axis.
-
Use the Line tool to draw a straight edge parallel to the length of the shape you want to bend, ensuring it’s parallel to the red axis.
-
Draw a curved edge that represents the bending path for your new shape.
-
Select the group or component you want to bend.
-
Choose Plugins > Chris Fullmer Tools > Shape Bender to activate the tool.
-
Click once on the straight edge you drew in Step 3.
-
Click once on the curve you created in Step 4.
-
Review via the green preview to see what you're about to get. If the shape looks backward, press the Up Arrow key on your keyboard to reverse the direction of the bending path. You can also press the Down Arrow key to change the direction of the straight edge you created in Step 3.
-
When the preview looks the way you envision, press Enter to finish the transformation.
Follow Chris’s instructional video about making a curvy ramp or road for more practice.
Pro tips for mastering the Shape Bender Extension
Location matters
Pay attention to the location of the straight, red axis-aligned edge you draw relative to the object you plan to bend. It acts as the origin point for the operation. If you want your bent object's center line to follow the bending path precisely, draw the straight edge right through the center of the original object.
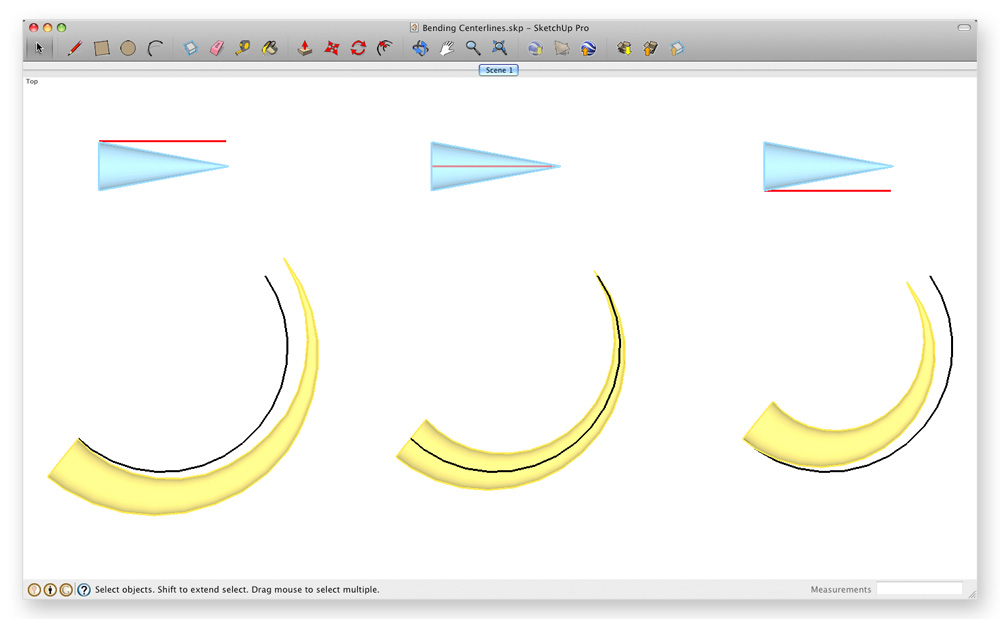 Note the different positions of the red line relative to the original blue cone in the above three examples. Where you position the straight line affects the result of your bending operation.
The length of your straight line matters
Its length affects how the object you’re trying to bend stretches or shrinks when you bend it. If you want it to stretch, make your straight line shorter than your curved one. If you want it to shrink, reverse that. Make both lines about the same length to keep things from stretching or shrinking.
Beginnings and endings matter
Draw your curved bending path so its beginning and end points are at different places along the red axis.
Weld your bending path
The edge you designate as a bending path needs to be continuous; it can't be made up of more than one segment. To glue multiple segments together, use the Weld Edges command in SketchUp.
Creativity is all about rule-bending
Crafted specifically for SketchUp, the Shape Bender extension is all about transforming and tweaking geometrical objects along a customized curved line or pathway. It's your digital sculpting tool, enabling you to mold your designs like clay. Get out there and start bending the rules. You never know what creative marvels you might uncover.
If you don’t have SketchUp, don’t worry; you can still try this extension workflow using our free trial. If you're ready to start designing your next project in SketchUp, check out our subscription offerings.