Six tips to maximize the Revit Importer
SketchUp’s much-anticipated, native Revit Importer headlined our 2023 Studio update. Now that you’ve had some time to test it out, use these six tips to step up your Revit to SketchUp workflow and save yourself — and your project team — hours or even days.
Spread the word — SketchUp’s Studio subscription now includes an all-new, native Revit Importer. We’re energized by the excitement and feedback we’ve heard from the SketchUp community since the official launch in February. The tips and tricks below will streamline your workflow from Revit to SketchUp and back again.
You’ll want to try this
The Revit Importer needs no introduction. Much like it sounds, the importer brings Revit models into SketchUp, converting families and building elements to SketchUp’s native tags and components. It optimizes geometry, creating a lightweight and well-organized SketchUp file that’s ready to use. What’s most exciting is the importer empowers everyone in the AEC industry — not just architects and high-powered Revit users — to very easily bring Revit files into SketchUp at any stage of the design.
Before we get to the workflow tips, let’s highlight just a few key scenarios where moving from Revit to SketchUp makes sense. These are the moments where the importer really shines.
Conceptualize and share — faster!
In all but the most idyllic of projects, you may come to a point where a design choice doesn’t work exactly as envisioned. Of course, there’s always a deadline, so you need to model and study alternate solutions quickly. SketchUp excels when it comes to conceptualizing and communicating ideas. Jump into SketchUp to make design decisions faster without committing to hours of detailed work in Revit.
Unlock new geometry
Even on the best days, complex geometry can be difficult to build and manipulate in Revit. Import your latest model into SketchUp to add new geometry that might otherwise be too time-consuming to build natively in Revit. 3D Warehouse, a library of millions of pre-built SketchUp models, speeds up your workflow and lets you explore 3D models that Revit doesn’t typically handle, like specific furniture from real-life brands, plants and landscape features, or specialty equipment.
Share with the extended team
SketchUp’s widespread use across the AEC industry means that the majority of your project partners are familiar with it — and if not, its intuitive tools are easy to pick up. Landscape architects need the latest 3D model to design accurate site context (not to mention SketchUp is great for showing trees and vegetation). General contractors may use SketchUp models for phased workflow planning. For project stakeholders that don’t work in Revit, the importer enables you to widely share up-to-date 3D models with minimal effort.
See what’s possible
Take your imported 3D model on-site using SketchUp for iPad, available in all SketchUp subscriptions. Open the model on your iPad for mobile walkthroughs, and use augmented reality to take stakeholders on a virtual tour of their soon-to-be project while you’re on the job site. Lightweight SketchUp models plus iPad make on-the-go show-and-tell easy.
SketchUp helps you more effectively ideate and communicate at any stage of the design process. With no shortage of ways the Revit Importer can both simplify and expedite your workflow — not to mention the ease of the import — you’ll be on the lookout for any excuse to jump into SketchUp.
Subscribed to Go or Pro, but not Studio? Take a look at these three interoperability tips for other ways to move from Revit to SketchUp.
Revit Importer top tips
With a little pre-planning and a few considerations, you can seamlessly transition from Revit to SketchUp.
1. Start with the import logic
Revit starting view and levels translated to sections in SketchUp — some of the importer’s default logic
Understanding the Revit Importer’s default behavior lets you know what to expect in SketchUp. You can control which elements are imported into SketchUp using view templates, graphic overrides, and hide/unhide in Revit. These are the basics of the default import logic.
- Everything visible in Revit’s default 3D view will be included in the import. Anything hidden in that 3D view will not transfer.
- Revit families are converted into components and tagged with the name of the family category (i.e., walls, floors, windows, furniture).
- Entities in Revit are imported as SketchUp components. Identical entities are preserved as identical components in SketchUp, enabling you to edit all instances of the component when you edit any one of them.
- Levels from Revit are imported as sections in SketchUp, letting you easily view each floor plan. Each section is given the same name as the associated Revit level.
- Interior and exterior finishes are converted to colors, not materials. Transparent materials are supported and converted, so glass comes in as a transparent color. All surfaces with the same specified material in Revit will be the same color and transparency in SketchUp (more about materials below).
- The importer places models at a consistent location based on the origin point. If you re-import an updated model, it will land in the same place as the old model in SketchUp.
Simply put, we designed the importer to create an immediately usable SketchUp model. It’s as though you built it — and organized it really well — natively in SketchUp. No surprises!
For a more technical dive into the ins and outs of the Revit Importer, check out the Revit to SketchUp help article.
2. Good modeling and good design go hand-in-hand
Minimize the number of unique elements, materials, and tags to keep models lighter weight and easy to navigate.
What’s good for modeling is typically good for construction. Keep a clean, well-organized Revit file with as few materials and unique families as possible. Before importing, double-check your Revit model. Clean up unnecessary model elements so you don’t end up with unwanted tags, colors, and data bogging down your SketchUp model. You wouldn’t use 50 window types if you can get away with four or five. In SketchUp, this equates to a better-organized, lighter-weight, more usable file. In construction, it means simplified planning, reduced cost, and more efficient installs.
This clean-model thinking applies to sharing models with consultants too. Landscape architects may only need the building exterior so they can add site context around it — no need to bring in MEP fixtures, HVAC equipment, furniture, etc. Hide those elements in Revit before the import for a more optimized SketchUp file.
3. Retain and share project phases
Construction projects often include phases that dictate what work should happen and when. Phases aren’t a standalone feature in SketchUp, but preserving and sharing your Revit phases using Tags is simple.

Preserving phases from Revit to SketchUp
The goal here is to separate phases in Revit and bring each in with its own import. Importing each phase without any other geometry will turn that entire phase into a single component. You can then tag it with the name of the phase and hide or show it as needed. Here’s the breakdown.
- In Revit, hide everything in your model except for the phase you want to import.
- Save the model.
- Import the file into SketchUp. You should see the phase you just saved in Revit, turned into one big component.
Pro tip: You may need to hide certain tags or geometry in your SketchUp model to see what you just imported if there’s overlap between that phase and anything else you’ve already transferred into SketchUp. The importer defaults to the same origin point each time, so as long as you didn’t move things in either model, the phase you just imported will align perfectly with other parts of your SketchUp model. It may just be hidden under other geometry. - Create a new tag with the name of the project phase. Select the new component, and assign it the phase tag.
- That’s it! Your phase is now built as a component and tagged for easy file organization. Toggle the visibility of the tag off or on depending on what you need to show the team.
- Repeat the process for any other phases you want to preserve in your SketchUp model.
With a little pre-planning, parse out your imports to bring in phases and tag them so you can toggle them off and on independently. If your Revit model is organized, it likely will have taken you longer to read this section than it will to import your next phase!
4. Replace materials with just a click (or two)
The importer gives you a solid foundation for materials. It converts interior and exterior finishes from Revit to solid colors in SketchUp and supports transparent materials. If you’re familiar with Revit, the colors in SketchUp match the appearance of the consistent colors option. Depending on your style, you may want to add textures or swap in specific materials.
Create a material palette to quickly replace colors from Revit with SketchUp’s native materials.
With the free Material Replacer extension by Thom Thom, quickly replace those defaults with your SketchUp materials in just a couple of clicks.
- To use the extension, activate the tool and select a surface that has the imported color you want to replace.
- Next, click a surface that has your target material, i.e., the material you want to replace the imported material with. This replaces that selected material throughout your entire SketchUp model.
This extension can be used when first importing a model into SketchUp and is helpful when re-importing an updated Revit model. The model will revert back to those default colors each time you import. If you’ve already specified your materials in SketchUp, they’re saved in the model for you. Now it’s just a matter of clicking one instance of the color to replace and one instance of the material you want.
Pro tip: create a material palette when you first import your Revit model. This can be as simple as two rows of squares, one with the material you want to use and one with the corresponding colors from Revit. No need to search around the model for each material; you’ve got everything you need right next to each other. You’ll notice as you replace materials, the defaults within the palette are also replaced. You can preserve the palette for future use by saving it in a different file or as a component in another file. With each new import, just copy the palette back into the model to reuse.
5. Preserve scenes when updating models
Scenes in SketchUp let you or anyone you’re sharing a file with click a single button to move to a pre-saved view of your model. Once you save scenes, any level of SketchUp user can quickly navigate your model and see exactly what you need them to see.
When you import an updated Revit model into a file you’ve already spent time on, the last thing you want to worry about is updating every scene. Avoid this tedious task by making sure the new model is perfectly aligned with the old one. You can take a few routes to ensure updated models or individual components align perfectly with the original.
Don’t move the model: the importer defaults to the same location based on the model origin. Before importing, delete the parts of the old model you want to replace (maybe you just want the building from Revit, but the site context built in SketchUp is good to go) so you don’t end up with two models sitting on top of one another. Run the importer, and the new model will populate in the same spot as the old one.
These next two options are different variations on replacing a component. Re-import all or part of your Revit model into the SketchUp file you’ve already created. Both are helpful if you’ve moved parts of the model and when sharing models with consultants. Use the fact that the importer converts geometry into components to your advantage to easily swap old for new.
“Replace selected”
‘Replace selected’ component to easily place an updated component in the same location.
Let’s say you have an updated structural model from your engineer. Use the importer to bring just the updated structure into your SketchUp model. It will come in as a new component.
- Select the old component in your model.
- With that selected, find the new component to replace it with from the “Components” tray
- Right-click the component in the tray, and choose “Replace selected.” This will replace the old with the new in the same location as the old.
Pro tip: this workflow will create duplicate components in your file. Even though you delete the old component from the model, SketchUp saves it in the file so you can use it later. Use the “Purge unused” command to delete the duplicate permanently. “Purge unused” will also remove unused materials and styles and is a great habit to get into to keep your file size down and ensure files are as clean as possible before sharing. From the “Window” dropdown, open “Model Info” to find the “Purge unused” button.
"Reload"
‘Reload’ achieves the same goal as ‘Replace selected’ without creating a duplicate component in your model.
Reload quickly replaces all instances of the selected component with a new version. It’s handy for replacing furniture, windows, plantings, etc. — anything repeated in the model where you want to replace every instance. Reloading avoids duplicate components in your model and speeds up processing time by not importing a new component into an already large SketchUp file. We’ll use the same example from above.
- Start a new SketchUp file and import the updated part of the model into the new file. What you import should be the portion of the model you want to update, again converted into a component.
- Save the file with only the component you’ll use to replace the old one.
- Back in your main model, select the component to be replaced.
- Right-click that component and choose “Reload…”.
- Select the new file you just created from the dialog, and click open, “reloading” a new version of the component.
Pro tip: to make some friends on your project team, share the “reload” workflow. Send consultants just the smaller, updated component files instead of the entire model. With the updated component file, they can select the old component in the SketchUp file they’re already working on, hit “Reload,” and replace the old with the new without even opening the updated file you shared. Save them the copy-and-paste and the duplicate components, and you’ll be the MVP.
6. Jump back into Revit
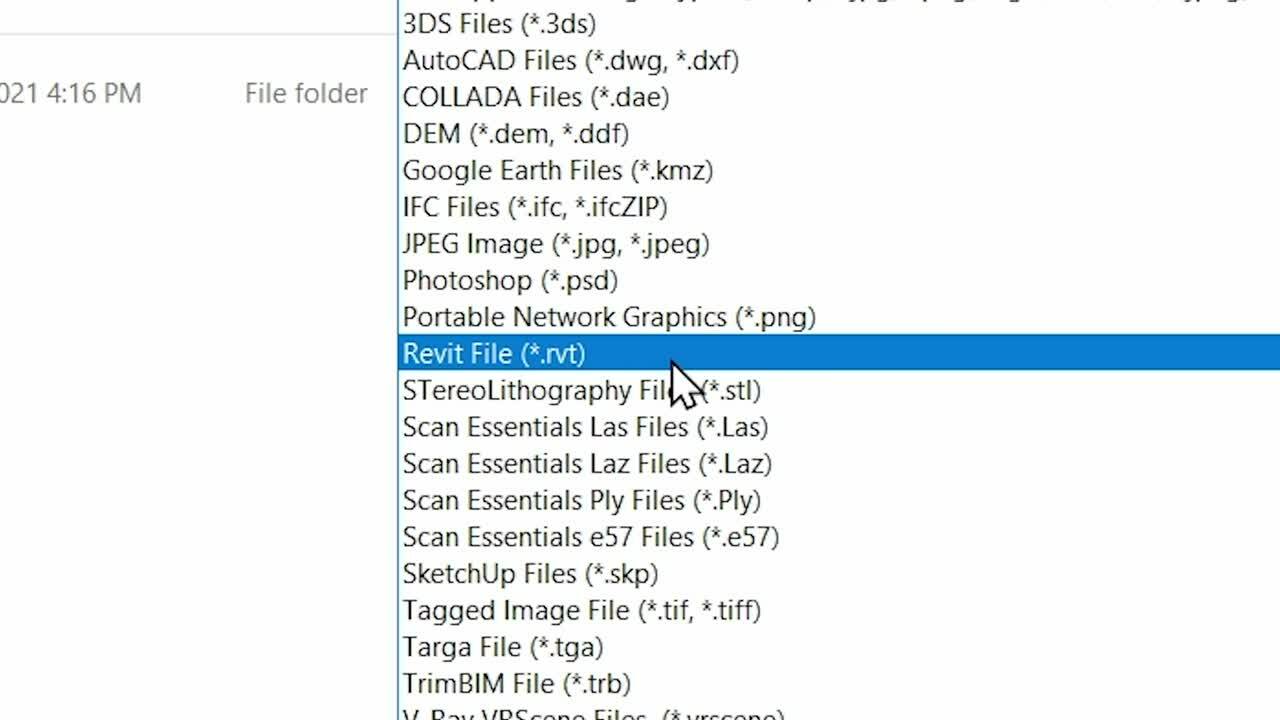
After making design decisions based on your SketchUp model, you likely want to go back to Revit to update a construction documentation (CD) set or finalize permit documentation. People often don’t realize you can bring SketchUp files directly into Revit by linking or importing them. From the “Insert” tab, use the “Link CAD” or “Import CAD” functions. It’s worth noting that you’ll need to have the file type in the dialog set to SketchUp files. The default is CAD file types, so you may not initially see your SketchUp file as an option.
The Link CAD tools in Revit provide a handful of ways to bring SketchUp models back into Revit
- Import CAD: there is a handy process for importing SketchUp geometry via IFC. Check out our in-depth Revit Importer demo for that workflow, and skip ahead to the Exporting IFC chapter. While converting your whole SketchUp model to Revit geometry is possible, it’s not generally recommended for well-developed Revit models. It doesn’t preserve everything you’ve already built into your Revit file and can also make for some finicky editing, with the new model often obscuring the old one.
- Link CAD: linking lets you use your SketchUp model as an overlay in Revit. You can see what edits were made and where new elements were added in SketchUp but make edits directly to the Revit model for precise updates. This keeps your model lighter weight by not adding new geometry and saves you from those overlapping model elements.
Note: if the SketchUp model shows up in Revit at unexpected locations, you may need to play with the “Positioning” and “Place at” controls in the insert menus.
BONUS TIP: take it beyond SketchUp
The Revit Importer makes it easy to pop in and out of SketchUp at any point in the design process, so you can quickly take your visualization and communication further. And now that it’s easy to move into SketchUp, take advantage of the wider Trimble ecosystem and other SketchUp integrations. Included with your subscription are a handful of Trimble tools that unlock new potential for your SketchUp model.
Use Trimble Connect to share models, gather feedback, and collaborate.
- Collaborate with stakeholders using Trimble Connect. Clients and consultants can access your shared model from any device, anywhere — no paid subscription needed. Collaborators can view the model, leave feedback, and assign tasks in the Trimble Connect web interface.
- Set your team up to present a model they didn’t build. Scenes saved in the model can be easily navigated when someone downloads and opens the model, either in their preferred version of SketchUp or in SketchUp for Web, which is free to access. With an intuitive, easy-to-learn interface, partners can easily click from scene to scene for show-and-tell.
- Access top visualization tools. Give life to your vision with beautiful imagery and real-time rendering with V-Ray® or your favorite visualization engine.
Try out the Revit Importer
Take the Revit Importer for a test drive with a free Studio trial. Don’t have access to a Revit file? Not to worry! You don’t need a Revit license to use the importer. Download this SketchUp HQ Revit model to test the workflows yourself, or watch the in-depth Revit Importer walkthrough to follow along with a live demo of these top tips.
If you already have a Studio subscription, you can access the all-new Revit Importer by updating to the latest version of SketchUp. Download it here or via your Trimble Account. If you’re ready to upgrade, purchase Studio or upgrade to Studio from your current subscription.
Learn about all the newest Sketchup tools and capabilities in the 2023 release post.